How to create a basic module in Magento 2
We’re going to build a very simple module in Magento 2. When
finished, the module’s output will say “Hello world!” in the block
content on a custom frontend route.
Before we start a Magento 2 module development, there are two things people often forget and we recommend you to do:
The easiest way to disable cache is to go to Admin → System → Cache Management → select all cache types and disable them.
In order to do this, open your terminal and go to the Magento 2 root. From there you should run the following command:
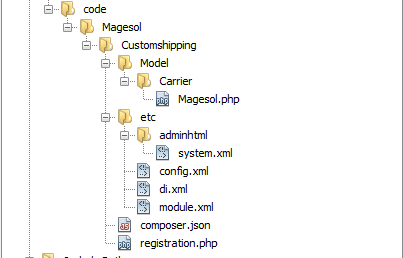
So our first step is to create the module folder and necessary files required to register a Magento module.
1. Create the following folders:
Note: If you don’t have the code folder in your app directory, create it manually.
2. Now that we have a module folder, we need to create a module.xml file in the app/code/Mage2sol/Helloworld/etc folder with the following code:
The frontName attribute is going to be the first part of our URL.
In Magento 2 URL’s are constructed this way:
1. Create a Helloworld.php file in the app/code/Mage2sol/Helloworld/Block folder with the following code:
The adminhtml folder is used for admin, the frontend folder is used for frontend and the base folder is used for both, admin and frontend files.
1. First we will create a helloworld_index_index.xml file in the app/code/Mage2sol/Helloworld/view/frontend/layout folder with the following code:
In our layout file we have added a block to the content container and set the template
of our block to helloworld.phtml, which we will create in the next step.
2. Create a helloworld.phtml file in the app/code/Mage2sol/Helloworld/view/frontend/templates folder with the following code:
$this variable is refrencing our block class and we are calling the method getHelloWorldTxt() which is returning the string ‘Hello world!’.
And that’s it. Open the /helloworld/index/index URL in your browser and you should get something like this:

Prerequisites
Needless to say, you will need the latest Magento 2 version which is currently 2.1. If you need any help with the Magento 2 installation we have a great article regarding this particular topic “How to install Magento 2”.Before we start a Magento 2 module development, there are two things people often forget and we recommend you to do:
1. Disable Magento cache
Disabling Magento cache during development will save you some time because you won’t need to manually flush the cache every time you make changes to your code.The easiest way to disable cache is to go to Admin → System → Cache Management → select all cache types and disable them.
2. Put Magento into a developer mode
You should put Magento into a developer mode to ensure that you see all the errors Magento is throwing at you.In order to do this, open your terminal and go to the Magento 2 root. From there you should run the following command:
php bin/magento deploy:mode:set developer
Creating the module files and folders
Module setup
If you have used the Magento 1 version, you’re used to the term code pools – community, core and local folders which reside in the app/code folder. In Magento 2, there are no more code pools. Modules are grouped by namespace and placed directly in the app/code folder.So our first step is to create the module folder and necessary files required to register a Magento module.
1. Create the following folders:
- app/code/Mage2sol
- app/code/Mage2sol/Helloworld
Note: If you don’t have the code folder in your app directory, create it manually.
2. Now that we have a module folder, we need to create a module.xml file in the app/code/Mage2sol/Helloworld/etc folder with the following code:
3. To register the module, create a registration.php file in the app/code/Mage2sol/Helloworld folder with the following code:<?xml version="1.0"?> <config xmlns:xsi="http://www.w3.org/2001/XMLSchema-instance" xsi:noNamespaceSchemaLocation="urn:magento:framework:Module/etc/module.xsd"> <module name="Mage2sol_Helloworld" setup_version="1.0.0"> </module> </config>
4. Open your terminal and go to the Magento 2 root. Run from there the following command:<?php \Magento\Framework\Component\ComponentRegistrar::register( \Magento\Framework\Component\ComponentRegistrar::MODULE, 'Mage2sol_Helloworld', __DIR__ );
php bin/magento setup:upgrade Creating a controller
1. First we need to define the router. To do this, create a routes.xml file in the app/code/Mage2sol/Helloworld/etc/frontend folder with the following code:Here we’re defining our frontend router and route with an id “helloworld”.<?xml version="1.0"?> <config xmlns:xsi="http://www.w3.org/2001/XMLSchema-instance" xsi:noNamespaceSchemaLocation="urn:magento:framework:App/etc/routes.xsd"> <router id="standard"> <route id="helloworld" frontName="helloworld"> <module name="Mage2sol_Helloworld" /> </route> </router> </config>
The frontName attribute is going to be the first part of our URL.
In Magento 2 URL’s are constructed this way:
So in our example, the final URL will look like this:<frontName>/<controler_folder_name>/<controller_class_name>
2. Now we create the Index.php controller file in the app/code/Mage2sol/Helloworld/Controller/Index folder with the following code:helloworld/index/index
In Magento 1 each controller can have multiple actions, but in Magento 2 this is not the case. In Magento 2 every action has its own class which implements the execute() method.<?php namespaceMage2sol\Helloworld\Controller\Index; use Magento\Framework\App\Action\Context; class Index extends \Magento\Framework\App\Action\Action { protected $_resultPageFactory; public function __construct(Context $context, \Magento\Framework\View\Result\PageFactory $resultPageFactory) { $this->_resultPageFactory = $resultPageFactory; parent::__construct($context); } public function execute() { $resultPage = $this->_resultPageFactory->create(); return $resultPage; } }
Creating a block
We’ll create a simple block class with the getHelloWorldTxt() method which returns the “Hello world” string.1. Create a Helloworld.php file in the app/code/Mage2sol/Helloworld/Block folder with the following code:
<?php namespaceMage2sol\Helloworld\Block; class Helloworld extends \Magento\Framework\View\Element\Template { public function getHelloWorldTxt() { return 'Hello world!'; } }
Creating a layout and template files
In Magento 2, layout files and templates are placed in the view folder inside your module. Inside the view folder, we can have three subfolders: adminhtml, base and frontend.The adminhtml folder is used for admin, the frontend folder is used for frontend and the base folder is used for both, admin and frontend files.
1. First we will create a helloworld_index_index.xml file in the app/code/Mage2sol/Helloworld/view/frontend/layout folder with the following code:
Every page has a layout hand and for our controller action the layout handle is helloworld_index_index. You can create a layout configuration file for every layout handle.<page xmlns:xsi="http://www.w3.org/2001/XMLSchema-instance" xsi:noNamespaceSchemaLocation="../../../../../../../lib/internal/Magento/Framework/View/Layout/etc/page_configuration.xsd" layout="1column"> <body> <referenceContainer name="content"> <block class="Mage2sol\Helloworld\Block\Helloworld" name="helloworld" template="helloworld.phtml" /> </referenceContainer> </body> </page>
In our layout file we have added a block to the content container and set the template
of our block to helloworld.phtml, which we will create in the next step.
2. Create a helloworld.phtml file in the app/code/Mage2sol/Helloworld/view/frontend/templates folder with the following code:
<h1><?php echo $this->getHelloWorldTxt(); ?></h1>
$this variable is refrencing our block class and we are calling the method getHelloWorldTxt() which is returning the string ‘Hello world!’.
And that’s it. Open the /helloworld/index/index URL in your browser and you should get something like this:

Comments
Post a Comment